Apple allows Mac users to connect external 4K and 6K displays with their devices. This dual monitor setup helps MacBook owners to improve their productivity. However, many users have experienced screen glitches after installing the second monitor. Mac also forgets the dual monitor arrangement after getting into Sleep mode.
This dual-screen setup error usually occurs due to misconfiguration. Did you install an incompatible monitor on the MacBook? It could also conflict with the Apple laptop’s dual monitor arrangement. As a result, Mac automatically interchanges the two screen’s positions or orientations. Besides, you may notice that the dual monitor’s mouse arrangement also has changed.
Let’s see how you can fix this Mac’s dual monitor arrangement problem.
Troubleshooting Tips for Mac’s Dual Monitor Setup Error
Apple released the macOS Monetary 12.3 update for M1 and Intel-powered users on March 14, 2022. Many users noticed a loss of dual monitor functionality after installing this update. The Mac device also interchanges the resolution of the two screens.
But, you can fix this dual-monitor setup issue easily by following these solutions:
-
Increase the Two Screen’s Sleep Time
Change the screen time from 5 to 20 minutes to prevent the Mac from forgetting the dual monitor setup. Additionally, you can set the lock screen time to 1 hour or more than that, if required. The macOS Monetary users must first access the Apple menu. After that, head toward “System Preferences” and tap on “Battery”.
Click on the “Battery” when the next window appears on the Mac screen. Choose “Turn display off after” to adjust the two screen’s timeout. Set the screen time limit to 1 hour or 3 hours or “Never” and close the “Battery” window. Restart the Macbook and use the dual monitor without experiencing further glitches.
How to increase the Screen Time in macOS Ventura and Older Versions?
If you face the dual monitor arrangement issue in the macOS Ventura device, tap on the Apple icon and navigate to “System Settings”. Locate “Lock Screen” when the Mac setting window appears.
Scroll down to the page and choose “Turn display off on battery when inactive”. Select “3 hours” or “Never” when the pop-up menu opens on the Mac screen. Now, you can stream games or work on the laptop without experiencing screen issues.
-
Adjust the Mission Control Settings
Mission Control lets Mac users view all the apps in full screen or “Split View”. This feature can sometimes interfere with the dual monitor’s resolution or settings. Thus, tweaking the “Mission Control” settings may help you to fix this problem.
Here is what you need to change in this feature:
- Access the Apple menu and select “System Settings” from the drop-down menu.
- Choose “Desktop & Dock” when the new window appears on the Mac screen.
- Scroll down to the page and search for “Mission Control”.
- Toggle off “Automatically rearrange spaces based on most recent use”.
- Look for “Displays have separate spaces” and uncheck this box.
Turn off the MacBook Pro or Air after changing the “Mission Control” configuration. Wait for at least 2-3 minutes and restart the Apple laptop. Try to work on the external display and check if the Mac causes any issues. It will probably remember the dual monitor arrangement after adjusting this setting.
-
Disconnect and Reconnect the External Screen
The Mac laptop will generate this issue if the external display isn’t connected properly. Thus, you must disconnect and reconnect the second monitor to resolve the problem. Remove the cable from the Thunderbolt port that has connected the external screen to the Mac.
Plugin the cable into the Mac port and connect the second monitor. Position the screen and the Mac and turn on the Apple laptop afterwards. The Mac device will automatically detect the second monitor when it restarts.
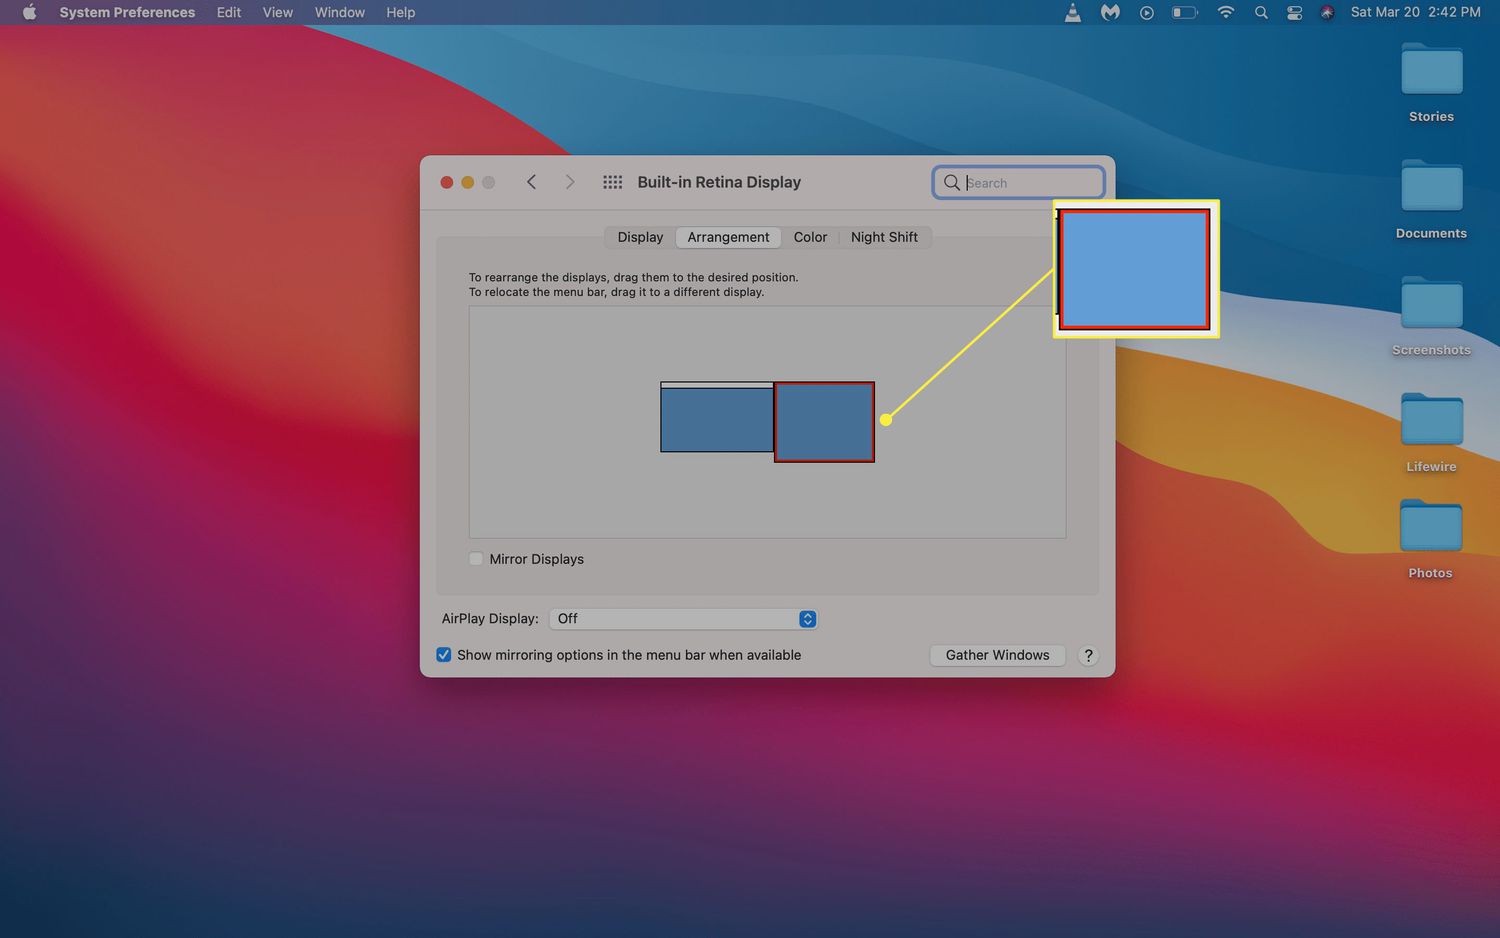
Tap on the Apple menu icon, go for “System Preferences”, and click “Displays”. Head towards “built-in Retina display” and choose “Arrangement”. Uncheck the “Mirror Displays” box of the main display when prompted.
Mac will show you the position of the second monitor. Adjust the secondary monitor’s position by dragging it in the correct position. Go to “Display” to configure Mac’s external display settings. Check whether the new monitor’s image is discoloured, stretched or blurry. If yes, tap on “Scaled” to improve the second screen’s image quality.
Additionally, you must choose the correct resolution for the second monitor. Select a screen resolution that will be compatible with Mac. Otherwise, the laptop may cause discolouration issues when using the new monitor. If Mac’s second display looks right, close the display settings and start using it.
-
Reset the SMC or NVRAM
Resetting the SMC and NVRAM can force the device to detect the peripherals, like external monitors. However, this solution will only work on Intel-equipped Mac laptops.
Do you use M1-equipped or any newer Apple Silicone chipsets? You can’t fix the dual monitor arrangement issue with an SMC and NVRAM reset.
Here’s how a Mac user can reset the laptop’s SMC:
- Force shut down the Mac laptop by pressing the power button for 3-4 seconds.
- Hold the right “Shift”, left “Option”, and left “Control” keys simultaneously for 7 seconds.
- Hold these keys and press the laptop’s “Power” button for another 7 seconds.
- Release all these Mac keys simultaneously and turn on the MacBook.
Here’s how Mac users can reset their Intel-powered laptops:
- Access the Apple menu and select “Shutdown” to turn off the MacBook.
- Press the “Power” button and hold the “Command, Option, P and R keys together before the Apple logo appears.
- Don’t release these keys until the Mac laptop restarts.
- Release all the keys when the Mac laptop displays the Apple logo for the second time.
The Mac won’t change the screen orientation after resetting the SMC and NVRAM. However, something is wrong with the second monitor if the error persists. You must change the faulty screen with a new one in such an instance.
-
Downgrade to macOS Ventura
Downgrade to macOS Ventura if the laptop is causing a dual-screen setup issue. Moreover, Apple provides three options to reinstall the previous macOS. You can use “Time Machine” or “macOS Recovery”. Users can also downgrade to macOS Ventura from Monetary using a bootable installer.
How to Downgrade to macOS Ventura using Time Machine?
Back up the essential Mac files before using this tool, otherwise, you may lose the required files after reinstalling the old macOS version. Then, access the Apple menu and tap on “Restart” when the pop-up menu appears.
Press the Command and R keys together when the Apple logo appears. Do you use the M1 or M2-powered MacBook Air or Pro? Press the “Power” button instead of Command and R key combos to get the startup screen. Select “Options” and then opt for “Continue”.
Choose “Restore From Time Machine Backup” from the option list. Tap on “Continue” and wait until the next screen appears on the Mac screen. Click “Restore from Time Machine” and select “Continue” when the pop-up message appears.
Select the “Restore Source” and the macOS version you want to reinstall. The Time Machine tool will revert to macOS Ventura within a few minutes. Restart the Mac laptop after restoring the older macOS version. Try to work on the monitors and check if Mac changes their orientation after getting into Sleep mode.
How to Downgrade to macOS Ventura in Recovery Mode?
Apple allows Mac users to reinstall the previous OS version in Recovery mode. However, you must first shut down the Mac laptop from the Apple menu. Wait for a minute and then press the “Power” button.
Hold the “Shift”, “Option”, “Command” and “R” keys together before the Apple logo appears. Enter the password when prompted and tap on “Continue” afterwards.
Select “Next” when the next window opens and opt for “Reinstall macOS”. The macOS reinstallation process might take a while. Reboot the Mac device and check if the dual monitor arrangement issue is resolved.
How to Downgrade to macOS Ventura using a Bootable Installer?
Reinstall the macOS Ventura using a bootable installer if you don’t have a backup. Restart the Mac device while pressing the “Option” key to get the boot options. Then, release the Option key and hold the Command and R keys together to enable “Recovery” mode.
Enter the password when prompted and tap on “Utilities”. Navigate to “Startup Security Utility” and allow the Mac to boot from external media. Restart the Mac device while pressing the “Option” key, and then choose the USB drive name.
Select “Disk Utility” and click “Continue” when the pop-up message appears on the Mac screen. Locate the macintosh hard disk and choose “Erase” to remove the data. Select the drive format and tap on “Erase Volume Group” afterwards.
Close the Disk Utility window and restart the laptop while holding the “Option” key. Choose “USB” as a boot source when the startup menu appears, and choose the drive for macOS Ventura installation.
Select “Install macOS Ventura” when the next window opens and click “Continue”. Restart the Mac laptop after reinstalling the previous macOS. You can do important office work on a dual monitor setup without glitches.
Connect with Urban Clap to Fix Mac’s Dual Monitor Arrangement Issue!
Mac laptops may generate this problem of a faulty external display. Get in touch with Urban Clap in such instances to replace the second monitor. The experts offer MacBook screen repair services at a reasonable price. So, book a flexible yet effective service and resolve the screen glitch with experienced experts.